About Me

My photo
Newcastle upon Tyne, Northumberland, United Kingdom
This is a blog I use to share my papercraft projects. I make them for friends and family, as well as selling them to fund my craft stash. You can get in touch with me at loumac03@gmail.com if you have any questions or would like to place a commissioned order.

Tuesday 30 September 2014

Warmest Winter Wishes

Morning guys! :)

It's time for a new challenge over at Passion for ProMarkers.

This week we wanna see your feminine makes! 

MAKE IT FEMININE

I wanted to go against the grain a little, so I opted out of pink and frilly. Instead I went with blue and texture. I hear ya, I hear ya! ..but I took some inspiration from a gorgeous photo I came across while scouring Pinterest! 

Glamorous Hollywood style tufted headboard against floral and branch wall covering.
http://www.pinterest.com/pin/474918723177846146/

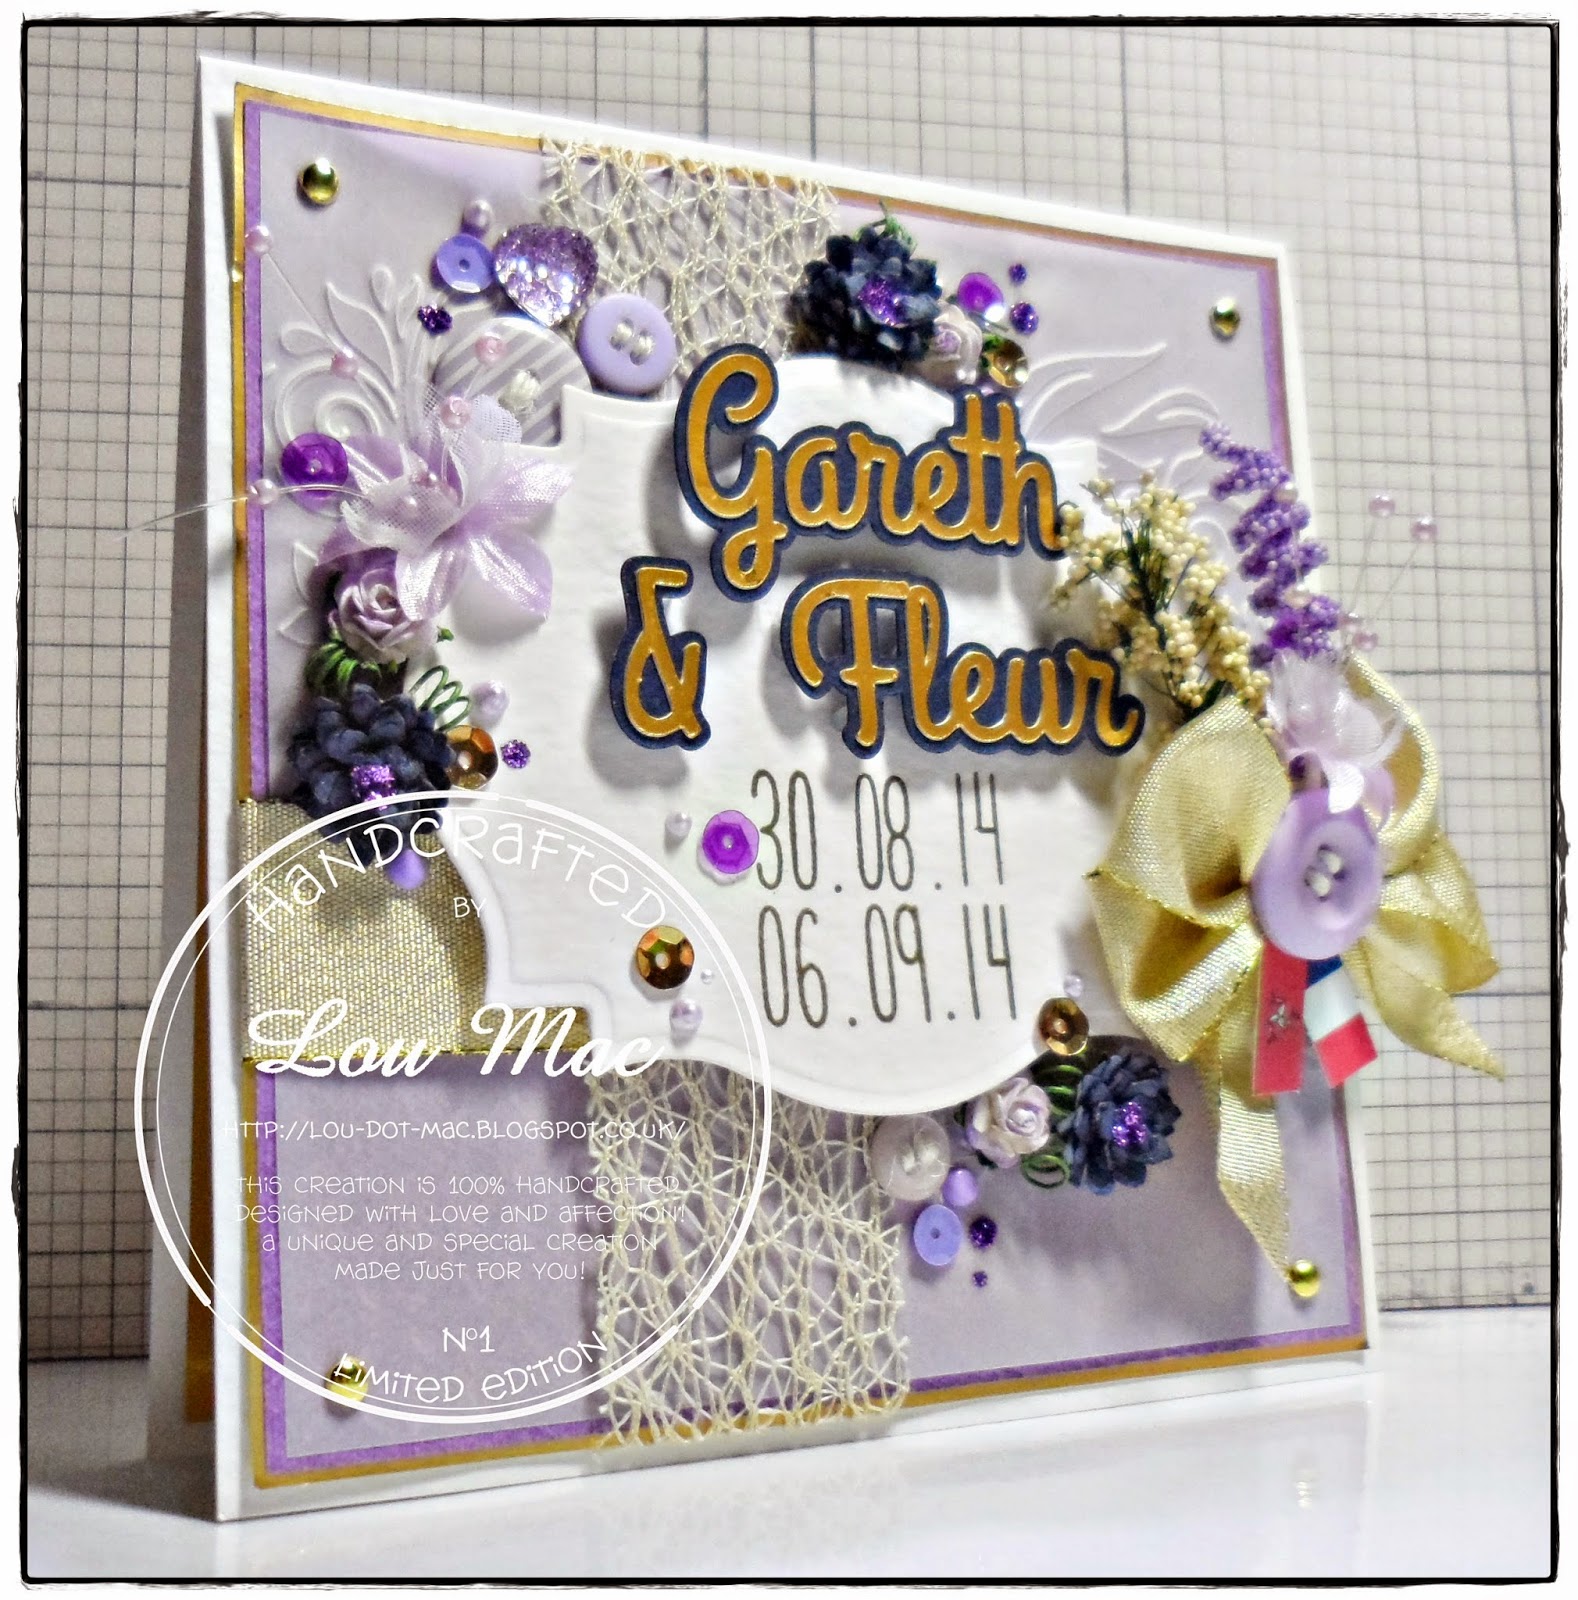
I loved the colours and the texture in this photo. So I used this as my starting point to create this card. I wanted to create a winter card, so I used the gorgeous Super Cute Hat from Time for Tea Designs.

I really wanted to practice my hair, as I feel like I've let it slip after concentrating on folds and creases for so long, so this was the perfect image for that. This took me almost three hours to colour up - good job I wasn't in a race.


I added an embossed panel to a kraft mat before layering a doily and my image on top. I then added a strip of snowflake paper from LOTV and edged it with some loopy trim. I then dug out some die cut vellum snowflakes and attached them by stitching white buttons over the top.

I added my sentiment from Amy R Stamps before looping some white cord around and around and tucking it under the image panel. I adhered it with glue dots and kept fiddling until I like how it looks. I really like how that turned out - I'm glad I've now found a use for all the colours of cord I seem to have sitting in my stash that go unloved! 

To finish the card off I added a sprinkling of Doodlebug sequins here and there to match the doily which I also sprayed silver with my Fireworks (although you can't really tell from the photo, it's super shiny IRL).

That was that! I hope I've inspired you to think a little more outside the box with this challenge. 

Be sure to stop by the Passion for ProMarkers blog to see what other amazing girls have come up with! xo

Thursday 25 September 2014

Make it Mini

Morning you lovely lot! 

Today marks my last make for the month of September as guest designer over at Little Miss Muffet Stamps! *sad face* *pet lip*

We have an awesome challenge for ya to join in with though.

MAKE IT MINI

We wanna see, ATCs, tiny little images, small boxes, anything your heart desires!


I just had to make a little keyring. These 'create your own' keyrings came into work a while ago now, and I picked up a couple.. because I could. With absolutely no idea what I was gonna do with them.

You know when things just click into place? ;)


I made her quite large and cropped her to size before I printed her out. I coloured her up using some of my fave colours - it's always fun to colour when you don't have any patterned papers to match! ;)

Thanks for stopping by today. It has been a blast creating weekly inspiration for you guys using Little Miss Muffet Stamps goodness! I hope you have enjoy my projects as much as me. Mwah! xo

Wednesday 24 September 2014

Your future is bright.

Hello guys! Why do weeks off work zoom by at super sonic speed?! Meeehhh!! That phrase.. time flies when you're having fun! It most certainly does.

Today I'm popping in to share some INSPIRATION with you all using products you can pick up at My Mum's Craft Shop

I spotted a card over on.. I wanna say Pinterest, but I'm not totally sure. I wish I had a link to give ya as it was a total inspiration, but.. I don't.


I started off with some Distress Ink in Tumbled Glass and Mustard Seed. I used some watercolour paper and created a little background with the DI and a tonne of water. I masked the edges of the watercolour paper with some washi tape to create a little white border.

I then stamped a sentiment from My Favorite Things - Watts Up? stamp set in Versafine Onyx Black ink. 

I then went to town building up my little lightbulb using the Die-namics Lightbulb die! I created a white base, and added another vellum layer which I used to inlay the little heart design in the centre. Very cute.

Before adhering everything down, as a last finishing touch I took some more Mustard Seed DI and some various circles from My Favorite Things - Bokeh Builder and added them in a diagonal pattern down the watercolour panel.

I adhered everything to an orange matt (I desperately need some rolls of foam adhesive, that watercolour paper refused to lay flat).. and then added it to my card base. Oh, and I chucked some Doodlebug sequins onto the design too.

I really love how this card turned out. It's always good to get out of your comfort zone every now and again! Be sure to to stop by the blog for daily inspiration and the website is regularly updated with new products. xo

Tuesday 23 September 2014

Christmas Frosting

Good morning you lovely lot! I finished up this little card in the early hours of the morning this morning (a lot of mornings in that sentence), when I couldn't get back to sleep after the boy had left for work!!

It was still dark outside my window and everything felt totally winter-y. Loved it.

I went for a bunch of red and black for this card. I absolutely LOVE Kelly's style, and I think these images lend themselves well to something a little different. 

This is Sugar Frosted. You can buy all of these images from That Craft Place Etsy Shop


I started off with some Echo Park paper from last year and added some white frantage in a diagonal pattern across the red patterned paper. I then cut a strip of the bauble paper and added a scalloped border along with a strip of grosgrain ribbon.

I added a sentiment from Amy R stamps, a couple vellum snowflakes, a bunch of sequins and that was job done.

I always have a blast colouring these cuties up! Grab yours HERE today! xx

Friday 19 September 2014

Sugars Doggies

Yippeeee!! Fridaaaay!! My last shift at work for an entire 9 days. Wherever you are in the world you will probably hear me squeal with delight at the end of my shift.

Today I am sharing a very special image with you guys! 


A design brought to you by That Craft Place!

50% of all profits will be making their way to Manchester Dogs Home! I couldn't think of a more worthy cause. Plus, the digi is adorable too! :)


I coloured this cutie up to match my papers from a way old Basic Grey pack called Max and Whiskers. I really do love the orange and teal combo! 

I added an Amy R sentiment, some Papermania and Prima paper flowers, a bunch of buttons, twine, velvet trim, lace trim and some liquid pearls. I think that busy patterned paper talks for itself, but I felt like going all out with the embellishments.. when don't I?! Hah!!

Be sure to stop by and pick up your image HERE! You know it'll be worth it. Oh, and be sure to share it on your blog and with us over at FB! Get the word spread! xo

Thursday 18 September 2014

Sweet Chester!

Good morning you lovely lot! It's Thursday, so that can only mean one thing.

Inspiration Thursday for Little Miss Muffet Stamps.  


I used the adorable Sweet Chester to adorn a little treat bag I created using my Cameo! I thought he'd be perfect for a whole big bag of candy canes! I coloured him in traditional colours, with a green sweater - which I added to with some green brads through the vellum snowflakes.

Cutie patooti!!

Thanks for stopping by today guys.

Wednesday 17 September 2014

Sunshine and Rainbows

Yooohoo! Happy Hump Day!!

I created this card for My Mum's Craft Shop.

I used Paper Smooches - Spectrum for the entire card.


I stamped and coloured on Neenah cardstock, added a yellow mat, and bam. Done.

I hope you like this CAS card. Be sure to stop by the My Mum's Craft Shop Blog for DAILY inspiration! :) xx

Tuesday 16 September 2014

Gift of the season

Morning guys! 

I've been spending the weekend getting my Christmas on, and this was one of my makes using a gorgeous new Tiddly Inks Fairy! I think I have eventually, gently, gradually started the ball rolling! I managed to get a couple more images coloured up, so I'm hoping to get those made up into cards over the coming weekend too.

So this card is for the new challenge over at Passion for ProMarkers

This week the challenge is MAKE IT DIGITAL

We wanna see you use your digital products! Digi images, digi papers - whip it all up together and show us what you got!! Here's what I came up with using Willow The Greeting Fairy from Tiddly Inks.


I cut the case base and the layers on my Cameo and using both Bazzill papers and cardstock. I added a sentiment from Amy R which I stamped and embossed using Love Letter Memento Luxe. As a final touch I added some Xcut vellum snowflakes with some rhinestones and liquid pearls. Boom! 

Thanks for stopping by today guys. Be sure to stop by the blog to check out the DTs awesome makes and the prizes up for grabs for the lucky winner. xo

Monday 15 September 2014

3D it LARGE!

Monday, Monday! This is my last week at work before my last week off for the year! I do suffer such a hard life! LOL!! 

I'm back with you all to share another commission with you all.

This card pushed me outside my comfort zone just a teeny weeny bit! I decided I would try and 3D the image! The photos are crap (as a result of my poooor photography skills), and it doesn't really manage to show how much dimension I managed to achieve with some fussy cutting, paper curling and a ton of silicone glue.


I used papers from My Minds Eye - bright and colourful was order of the day - I added a whole bunch of orange and pink goodness.

This design is *hopefully* going to live in a shadow box, so I made sure to really layer all of the elements up. For example, I created a double bow, added a ticket and then the age on top of the knot. I tucked in a bunch of paper flowers from Wild Orchid Crafts to the little gaps after I had stitched a few buttons to the design here and there.

I love these kinda cards, with everything going on for a few reasons. 1. I get to spend loads of time faffing (my favourite bit) 2. I get to use up a tonne of stash (which I am slowly getting better at) and 3. I *hope* it sets my cards aside from the rest, from the embellishments I choose to how I lay them out on the card.


This is definitely something I'd like to try again. It's a lot more time consuming, and for a girl who takes a good few hours to just colour a standard flat image, that's a tall order - but I love how it turned out! 

I'd love to enter this card into these challenges:
- Crafting at the Weekend - Anything Goes
- Alphabet Challenge - P for Pretty Petals
- Wags 'n Whiskers - For the Girls
Kenny K - Anything Goes

Thank you for stopping by. xo

Sunday 14 September 2014

1st Birthday

Sunday, Sunday! *love*

Sundays are usually always set aside for crafting time. In between house work and getting ready for my week ahead at work of course (boring ironing). So I can't wait to get stuck in this afternoon.

Today I'll be working on a wedding card with a truck load of purple pearls, some eye candy for Little Miss Muffet Stamps and some of the new images released from That Craft Place. My replacement ProMarkers eventually arrived yesterday. Yipppeeee!!

This morning I'm sharing another commission with you guys. This time it was for a little boys 1st birthday! I went a little OTT with the embellishments on this card, for it being male themed and all. I still kinda like it.


I used some baby papers from Echo Park, as the lovely who ordered this card had requested these colours after seeing a notebook I had previously made with them. I added some Rock Candy Stickles to the 1 and 'Oliver' both of which I cut on the Cameo before leaving to dry and adding a few buttons and the usual froofroo. 

Off to tidy my bedroom/craft desk before I get stuck back in again! I always gotta start with a blank canvas. xo

Saturday 13 September 2014

Little Pixie

Evening guys! 

After a jam packed day with the boyo, I've eventually sat on my butt for long enough to get a friendship bracelet started (a design I pinned over at Pinterest a couple days ago) and this blog post finished! Yaaaay. 

This is one of my lastest commissions from a lovely lady who ordered a whole bunch of cards in one go. I loved packing them all up with the pretty tissue paper and washi tape, the size of the parcels was hilarious. The lady at the Post Office wasn't a fan of me once I'd finished.. but that's neither here nor there.

This is the gorgeous Dandelion Fairy from Some Odd Girl, although a few girls over on my FB page have referred to her as a pixie, I think I like that!


I coloured her using bold, bright colours to match my papers from Echo Park, then went crazy adding a whole load of embellishment, including ribbon, buttons, paper flowers, beads and liquid pearls!! I cut an 8 on my Cameo, added part of the sentiment to a Paper Smooches banner and the rest of the sentiment down the right hand side of the design.

I hope the little girl loves this sweet, colourful pixie as much as I do! :) 

I'm off to add more knots to my bracelet before my eyes give up on me. Nighty, night guys. xo

Thursday 11 September 2014

Christmas Letters

Morning guys! Happy Thursday.

It's time for a new challenge over at Little Miss Muffet Stamps, and we have the best theme ever for ya! Anything Goes! :)

This little cutie has been coloured up since the beginning of August, and she has sat patiently waiting. I used a digi for my card, but this beauty is available in red rubber HERE.


I coloured her up in pretty neutral blues and beige and BAM with the red post box. This is just a lickle 5" card, so it didn't leave a lot of room for froofroo, although I still managed to squeeze some on.

I added a sentiment from Amy R Stamps which I embossed and cut using and Xcut die before adding it to my card with brads. The gorgeous organza ribbon and jewel button are from The Ribbon Girl, and I finished the design off with some vellum snowflakes and little red rhinestones.


Here's a close up of this cutie! I love her outfit. 

Thanks for stopping by today! xo

Wednesday 10 September 2014

You brighten my day!

Morning world! :) 

Another Inspiration Wednesday from me for you from My Mum's Craft Shop

Just like yesterdays card, I kept this one pretty simple. Only this time, I added some patterned paper! 


Super simple card, but so cute! LOVE.

Thanks for stopping by today. Be sure to stop by the My Mum's Craft Shop blog daily for loads of inspiration! xo

Tuesday 9 September 2014

Game On!

Remember the Clearly Besotted sale that was happening a while ago? Yeah.

I bought some sale stuff, and some other stuff.. and just generally went a little crazy with a huge order.

Within that order I picked up the set I used to create this card! 


I thoroughly enjoyed making this card. Cardstock, stamps, ink and embossing powder. Oh, and a few sequins thrown in because.. I can.

I stamped the card base with the headphones from the set in MFT Grout Gray before adding a few Bokeh Builder dots from MFT in Blue Raspberry ink, also a MFT Hybrid ink.

I then stamped and white embossed areas of the games controller onto some black cardstock which I had cut into three equal squares. I adhered these to the card using dimensonals. Added the cardfront to an aqua matt and added the entire design to the front of the card base using more dimensionals.

As a final touch I stamped a sentiment using a Lawn Fawn ABC set in Onyx Black Versafine ink and sprinkled some black Doodlebug sequins in a pleasing pattern.

That's all I got for ya! LOVE this card. I gotta make more like this and really start using all of the stamps I seem to be collecting as collectors items. xo

Monday 8 September 2014

Isla Mae

Who agrees, that's a gorgeous name?! Love it!! 

I created this card using a Hobby House topper for a brand new baby girl, Isla Mae.

I haven't had as much time as I might have liked to really make head way with my Christmas cards so far this year. I know I said a couple weeks ago my blog might be Christmas-y from here on out, I lied. I've been sooo busy with commissions and other DT work that I haven't really had time. This must change! Anywho.

Isla Mae.


I was desperate to use that feather paper from Carta Bella, and this was the perfect project for it! The perfect colour pink! Yum! I teamed it up with some green plaid paper from an Echo Park pack. It's not very often that I mix and match papers from different packs, but this time it totally worked! :)

I added a whole load of the usual froofroo. Any questions, don't be shy - just leave me a comment and I'll get back to you ASAP. Thanks for stopping by. xo

Sunday 7 September 2014

The Yeti and the Snowman

I went all out and had some me time at the craft desk yesterday afternoon! Did I really have time for it? Probably not! Did I enjoy every moment?! Definitely!

Sometimes I forget what got me started on this little card making journey of mine. I get all wrapped up with DT work (which I thoroughly enjoy, else I wouldn't do it) or with commissions (sometimes working to a particular specification can become a little tedious after a while) that I often don't have time to do just what I want to do.

Yesterday afternoon, that all changed. I decided I wanted to play with my little Distress Inks, create a background and add some cute Christmas characters to them for some little notecards.

Here's what I did!


For the snowman card I began by inking up some Neenah cardstock with Mustard Seed, Peacock Feathers and Tumbled Glass Distress Inks to create an Aurora Borealis look to the sky (the Mustard Seed and Peacock Feathers make the most delicious green). I then added some white embossing paste through a stencil and added fineee, fineee glitter to the snowflakes before the embossing paste dried (hard to see the glitter in the pictures but it's a really lovely effect IRL.

Funny story. The glitter I used was so fine it was like dust and it was lingering in the air once I had flicked the excess from the card. It was lingering in the air so much so, that when I went to blow my nose.. my snot was glittery. I kid you not! 


Then for the next step I stamped, coloured, paper pieced and 3D'd up my little snowman from Paper Smooches - Freezy Fellas. I coloured him with my Cool Greys and some oranges for his nose, and then went to town with my patterned papers for his hat, scarf and buttons. I used patterns from Echo Park Winter Wishes pack. I used a sentiment from the Freezy Fellas set which I also stamped onto some more patterned paper and added to the night sky.

As for those little trees, I used the Yeti, Set, Go set from Lawn Fawn which has only recently come out and I am in LOVE with it!!

Yeti Set GoYeti, Set, Go Lawn Cuts

I also used the same set with the coordinating dies for my next card.


This time I began by stamping the snowflakes from the Yeti, Set Go set onto my Neenah cardstock before adding some Violet Pearl embossing powder (again, another detail that my crap photography fails to pick up) over the top and heat setting. I then went in with the same three colours of Distress Ink as before but went over the Mustard Seed with the Peacock Feathers multiple times to get that wonderful green colour just above my hills.

I stamped, coloured, paper pieced and 3D'd my little yeti (LOVE him) before adding him to the little scene with the hills (I inked the edges of those with Tumbled Glass DI) and trees from the set.

I stamped a sentiment from the set onto some more Echo Park patterned paper before adhering everything down with dimensionals and silicone glue. 

Ahhh. :)

Two little notecards, perfect for Christmas which I thoroughly enjoyed making with no restraints to work to. Wonderful.

Thank you for looking. xo

Saturday 6 September 2014

Hey, Sugar

It's been a long time coming, but eventually my Sugar and Spice project has made it to my blog! Hah. Only a week late.. sorry boss lady.


I decided to colour up the gorgeous Sugar in bold, bright colours to match my papers from My Minds Eye. I gave her bright blonde hair and coloured her top pink.. not my usual thing but I really love how she turned out.

I think it might have something to do with the usual style of the image! You can find all of these digis over at That Craft Place LTD on Etsy, along side a bunch more awesome images from different artists.


I die cut a bunch of stuff, including the banner, heart and speech bubble before going all out with buttons, brads and Stickles to finish the design off.

I can't wait to get the time to colour up more of these images. xo

Friday 5 September 2014

Two Wedding Days

We're heading into September, and I could *squeal* with delight!! It's officially Autumn, so that means cooler, breezy days with atmospheric clouds and rainy sounds on the roof becoming a regular thing. Honestly. I LOVE this time of year.

Anyway, let's just calm ourselves.. and crack on with the paper goodness.


I was asked to make this super special wedding card by a lady who I met at my first ever craft fair a couple years back. She got in touch with a special request for a wedding card for two dates,the lucky couple experienced two weddings in two countries, which is also why I was asked to include the flags in the design.


I also created a box with an acetate lid to match the card and to make it more of a keepsake for the couple. The lovely lady who commissioned this card came to pick it up in person and she almost shed a tear. That meant so much to me, it's what makes the late nights and the achy back all worth it!

Thank you for stopping by today. Happy September. xo

Thursday 4 September 2014

Little Miss Muffet Stamps Debut

Good morning you gorgeous lot! Can I just thank you all for the lovely comments you have all left me on my recent posts! :) It means an awful lot to me that you take the time out to stop by my blog and read my waffle. I hope my posts and projects inspire you all.

Today marks a very exciting day for me! Can I get a *oOoooOoo*
I've been scouted by the ridiculously talented Faye to guest for Little Miss Muffet Stamps for the month of September. Can I get a *yaaaaay* ;)

This is my first card for Inspiration Thursday! 

I used the adorable Jr. Hatter Abigail

I coloured her with my ProMarkers, but please don't ask me which colours I used. I wish I knew. I LOVE the colour of her hat, it matches the papers from Echo Park We Are Family collection perfectly but I never made of note of what I used. Not to worry. It's all about experimenting.


I added a sentiment from MFT which I stamped and heat embossed. I then raided my paper flowers box, as I knew I had some delicious lime green bad boys left to use up. I then die cut some flowers from pink cardstock and layered them up.

As always I finished off with some brads, buttons and sequins. Job done.

I'm over the moon to be taking part in the LMMS shenanigans this month. Stay tuned for more LMMS projects from me. 

Be sure to stop by the Little Miss Muffet Stamps BLOG to check out the other AWESOME DT designs.

Loves. xo

Wednesday 3 September 2014

Pretty Summer Dress

Yooohooo! :) It's Wednesday and it's time for some NEW inspiration for My Mum's Craft Shop using products which can be found over at the store.

This blog post is a bit of a double whammy, as I'm bringing you a card which features a digi image from the lastest release over at Time for Tea Designs.

This gorgeous lady is Pretty Summer Dress and I've coloured her up with my ProMarkers and made her dress a lovely distressed blue colour. LOVE! 


I kept this new paper pack from Echo Park in mind when colouring this image, hence the pink shoes and necklace and bright green grass. 

I stamped a sentiment from MFT - Clearly Sentimental in some Spearmint Hybrid Ink and added it to the design. As for froofroo I addeda bunch of lime green and pink flowers, lime green polka dot ribbon, a bunch of rhinestones, sequins and some cute polka dot buttons. 

Be sure to stop by the My Mum's Craft Shop Blog for DAILY inspiration from the awesome DT girls! Thank you for stopping by today. I'll be back next Wednesday for more crafty inspiration. xo

Tuesday 2 September 2014

Hey Buddy

Good moooorning guys! :) Who's getting ready to get their little ones packed off to school soon? Luckily I have nothing like that to worry about. I struggle, most mornings, to get my own butt outta bed and ready for work.. I'd have no chance tryna get a little one ready too. Nuuuh, uh!!

So to celebrate (because I know everyone will be breathings a little sigh of relief once they've had peace and quiet restored) we've got a brand new challenge over at Passion for ProMarkers to incorporate this theme of..

BACK TO SCHOOL

I knew straight away who I needed to use, and it's this little guy from Pollycraft. Brains! I got him in the Big Bundle Paula released before announcing she was shutting her little store for good. Sad times.. but Pollycraft lives on in the card making world through Little Miss Muffet Stamps too!! 


I coloured this little cutie up using my ProMarkers! :) I used some papers from My Minds Eye (a pack which I am coming to the end of, yipppeee!!) I added a couple speech bubbles which I stamped and embossed with a sentiment and a star from Paper Smooches. 

You might have fallen off your seat when you first spotted this card, well I hope you've righted yourself. I know it's super simple for me, with hardly any froofroo. I don't know what came over me. I stitched the two little buttons, added a few brads and then.. once I started laying sequins and what have you onto the panel, it just wasn't working for me. So I left it. I kinda like how clean (for me) it looks, but I just feel sorry for all of the embellishments sitting in my drawers that are still screaming to be used on every. single. card.

Anywho. Be sure to head over to the Passion for ProMarkers blog to check out the girls awesome inspiration for this weeks challenge. Thanks for stopping by today. xo

Monday 1 September 2014

Welcome, Little One.

A nip and a punch for the first of the month boys and girls. I can't quite believe it's September, but it is. It's got me thinking that I really need to pull my finger out and get cracking with my Christmas cards. As of yet I've made about 5, which just isn't good enough! Hah.

Anywho, it's time for a new challenge over at My Mum's Craft Shop
We wanna see those punches and dies being put to good use!


I began with an adorable bunny from Mama Elephant Honey Bunny
I coloured her up with my Warm Greys to create a little white bunny.
I then cut her out using the co-coordinating dies.

I then decided to sit the little bunny on a bed of flowers, and the Laurels set from Avery Elle was perfect for this. I began by die cutting a bunch of the flowers and four of the leaf fronds with the coordinating dies before stamping in Memento Bamboo Leaves, Spearmint, Cotton Candy and Grout Grey Hybrid Inks from MFT.

I finished the card by layering the design on top of a slice of paper from Echo Park - We Are Family, which I had punched using the Tonic Boot Punch - Edger 2 before adhering everything to the cardbase and stamping a sentiment using Lawn Fawn - Milo's ABCS.

Be sure to stop by the My Mum's Craft Shop Blog DAILY for inspiration and updates on new goodies! :) xo


Search My Blog

My Fellow Craft-o-Holic Followers

Total Pageviews