About Me

My photo
Newcastle upon Tyne, Northumberland, United Kingdom
This is a blog I use to share my papercraft projects. I make them for friends and family, as well as selling them to fund my craft stash. You can get in touch with me at loumac03@gmail.com if you have any questions or would like to place a commissioned order.

Wednesday 29 January 2014

Embossed Love

Morning guys, it's Wednesday again. That means it's time for me to showcase some My Mum's Craft Shop products using the new theme of..

'Something New'

I ordered a bunch of Paper Smooches from Kitty with their new release and almost screamed when I opened the envelope. They're gorgeous. I highly recommend you hop over to the Paper Smooches part of the shop and check them all out

This card is VERY clean and simple for me. Like, the. most. CAS. I'll. Ever. Get.

I used a textured white card base, some gorgeous navy blue cardstock from Papercuts and some Silver WOW embossing powder.


This would be perfect to give to a male for Valentine's. I know my boyfriend would appreciate a simple design like this more than something that was totally OTT with embellishments.

Thank you for stopping by today, I'll be back next Wednesday with an installment of MMCS goodies! xo

Tuesday 28 January 2014

You make me SMILE!

.. trust me. Not many things make me smile. If you wanna hear a short list it'd be: paper, animals, sunsets and sleep. Everything else is just.. meh! LOL! ;)

I always get told I look miserable (even if I am bursting with smiles.. inside) - I just can't help that the face my mother gave me looks sad! Hahaaaa. Plus, people rarely make me smile, so I don't care! 

All in jest, my friends. This is a total tangent from the real reason you're here today!!

It's time for a new challenge over at Passion for ProMarkers.

ANYTHING GOES

It's only once in a while Denise spoils us with such a laid back theme, so I wanna see a TONNE of entries!!


I thought I'd kill two birds with one stone today (awful expression - doesn't make me smile) and showcase a new stamp from Time for Tea Designs today too. This is the gorgeous FIRST LOVE. Her expression just kills me, and if you wanna practice your hair, this image would be PERFECT - there's a load of it!!


I used papers from Echo Park - For the Record 2. Love the reds and pinks in this pack, although there are not many. I thought I'd keep in line with the big black hair I'd coloured and add a few black die cut hearts, rhinestones and Stickles too. The sentiment is from an Amy R set and I stamped it in Versafine and Memento. Yummyyy.


Yet again, I have been getting asked a bunch of questions about my colouring - I love it!! Perhaps I should do a QandA kinda post some time? Yeah..

So a couple people have asked me what cardstock I use when colouring. Neenah Classic Crest 80lb Solar White cardstock. It's the best cardstock I have ever come across for alcohol markers, and I've tried a lot. I gotta say, it is down to your colouring style as to how well your cardstock will work for you. Try them out, that's the best thing I can suggest.

I also get asked a lot about how I colour with reds. For her trousers I have used:
Lipstick Red,
Red,
Poppy,
Crimson,
Burgundy,
Rosewood.

WORK FROM LIGHTEST TO DARKEST. Remember, you can always add colour, but it's definitely harder to take it away!! Map out with your lightest colour where you want your darkest to be, and build it up from there. Keep repeating this til you get to a depth of colour you're happy with. I went over her trousers twice using the same colours and technique.

IF YOU HAVE ANY QUESTIONS OR QUERIES ABOUT COLOURING, THE PENS, MY CARDSTOCK, HOW TO PICK COLOURS. Anything re. PMs/FMs - leave me a comment and I'll get around to compiling a QandA post when I end up with a decent amount of questions.

Now, I'd like to enter this card into these challenges:
- Ahola Friday - Something New
- Sketch Saturday - #294
- The Hobby House - Ribbons

Thank you for stopping by today. Sorry for the super long post, but I hope you made it through til the end. Be sure to head over to the Passion for ProMarkers blog and join in with our ANYTHING GOES challenge, including ProMarker colouring. xo

Monday 27 January 2014

Bezzie Mate and Skin Colouring Tips

Hey guys! It's Monday again. Back to work for us mortals. *yawwwnn*

I hear the weather was pretty bad in some parts of the country, with hail and thunderstorms over the weekend. I hope you're all safe. We merely had half an hour of torrential rain and a bit of wind - nothing exciting here.

So today, in sticking to my word, I thought I'd share another commission with you guys. I posted a few updates on my FB page as I was creating this piece, and I had a lot of comments about my skin tones. There have also been a few of my blog readers, old and new, who've asked me about my pens.

Stoopid Blogger (or stoopid me - I'm undecided which) can't work out how to leave a 'reply' link on peoples comments on my blog. Please, if you know how to chance that setting, any help would be gratefully welcomed!

For now, there's no other way for it than to include it in a post.

I use ProMarkers and FlexMarkers (I have recently treated myself to a few Tria Markers, but they're the exact same thing - I've been tryna fill in my pinks a little) for ALL of my colouring. I don't go in with pencils after, I don't use any Copics to fill in gaps in my colours - it's simply ProMarker and FlexMarker work.

That said, I have had a lot of questions about the colours I use for skin. 

Rose Peach (FM)
Peach
Soft Peach
Blush
Ivory
Baby Pink, Cocktail Pink

I always work light to dark, and back to light if the space on the piece I'm colouring allows for that. If the area I want to colour is small, and I'm using a saturated colour, like red or dark green then I work dark to light and try to lay down as little colour as possible.

Donna Jerrett commented on a colouring update on my FB page and asked what alcohol markers I used. She said the blending on my skin was seamless. She couldn't believed I used ProMarkers. Guys, this is why I will continue to fly the PM flag! Enough practice, getting to know your pens and your cardstock and there is no reason why we can't be as good as those Copic snobs (said in jest, of course).

So, that's all I got for ya today, I hope that's answered the questions I've been receiving lately. I always get asked to do tutorials, and every time I sit down to colour I get carried away in the moment and forget about it. Perhaps one day. One day soon. 


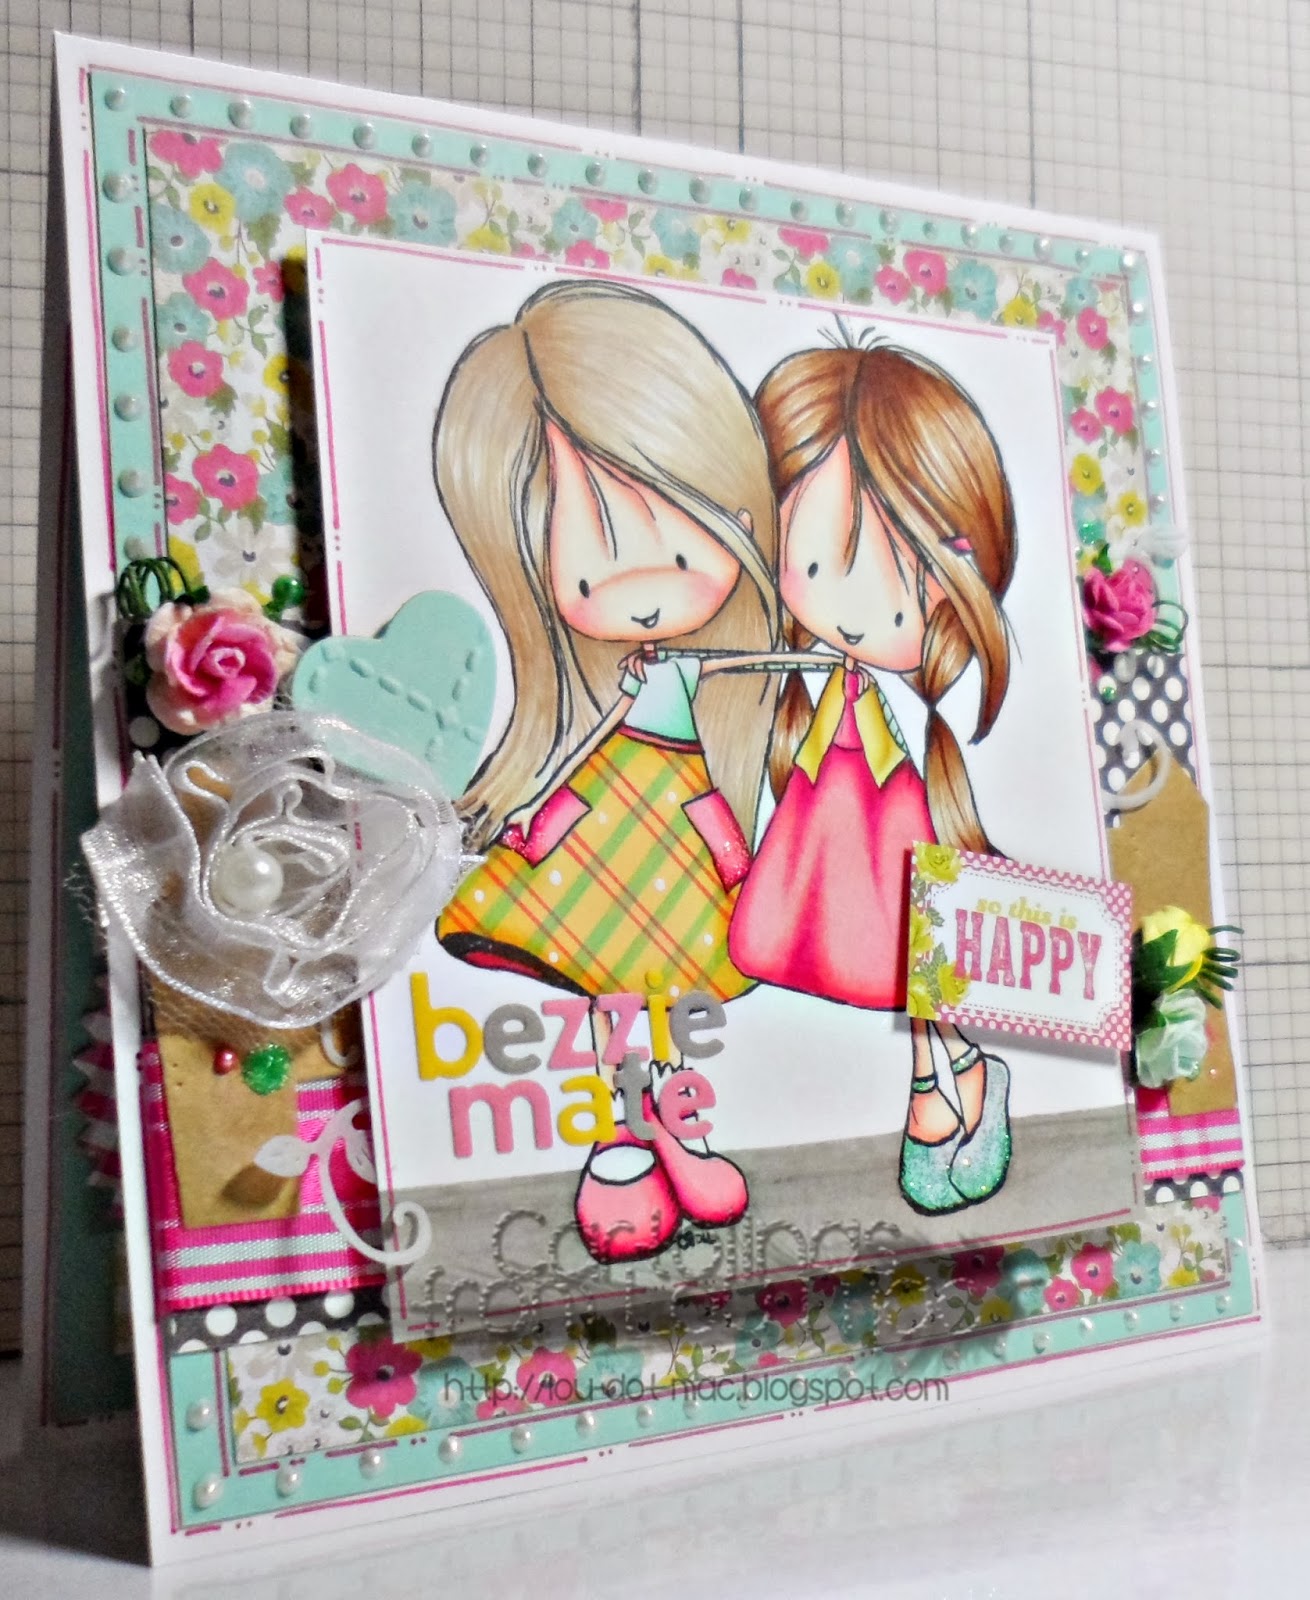
So as for my card, I used Wryn and Emmy BFF from Tiddly Inks. I've used this image a few times now and I never get bored of it. This time I decided to add a little pattern to the dress, very simply. I think if I was to do this again I would try and go with the flow of the dress, although I think that'd be tricky without making it look like a squiggly mess.

As this card part of a commission, I added the sentiment 'Bezzie Mate' with some Jillibean alpha stickers. I cut up some of the patterned papers from the My Minds Eye pack I'd been using and added a 'so this is happy' element to the other side of the image. 


I didn't want to add big, poofy bows to this design, as I didn't feel that's what it needed. Instead I used an organza rose and built the rest of my embellishments around that. A couple WOC paper flowers, an embossed heart and a sprinkling of the standard Stickles and Liquid Pearls finished this card off.

I'd like to enter this card into these challenges:
- Digi Designs Challenge Blog - Spots and Dots
- My Sheri Crafts - Delightful Digis
- Paper Creators Crafts - Anything Goes

That's it. Happy Monday and thanks for stopping by. xo

Saturday 25 January 2014

.. with a Cherry on Top!

Happy Saturday, guys! :) This morning I've been going through the photographs of my cards and trying to make some sense of them. I have a LOT of photos and I'm getting lazy when it comes to organising them.

This year I aim to have way more blog posts than 2013, and one way I am going to achieve that is by sharing my commissioned cards with you all.

This was a card I made way back at the beginning of December. I think this is the card that started me on my Some Odd Girl obsession again! Ain't got no complains here, I freakin' LOVE Kristys stamps! 


The thing I love most about this card is all the 'white' space I've managed to achieve. Usually when I'm making larger cards I feel like I have to cover every inch with.. something. This time round I tried to cluster all of my embellishments and sentiment around the main image. I think I found this easier because I layered the image up so that part felt a lot bigger when placed on the card. 

I gotta get me some more wide organza ribbon!! Why the hell have I held off using it for so long?! It creates the most pretty bows, so puffy but without being OTT - because the organza is kinda see through. I likey. Gotta use up more of my other ribbon first though - remember, I'm tryna be good!!

So I used a bunch of SOG goodness:


I coloured Tia up with my ProMarkers to match my papers from My Minds Eye. Hmmm, a bunch of the usual goodness including Wild Orchid Crafts flowers, liquid pearls and a pop of Kraft cardstock, this time in the form of a doily, finish this piece off nicely.

I'd like to enter this card into these challenges:
- Alphabet Challenge Blog - Y - Young card for a little one
- Delicious Doodles - Must use a Ribbon
- Creative Inspirations - 249 - Ribbons
- Pattie's Creations - For the Little Girls

I always get told that people can tell it's a Lou Mac creation a mile off, and that pleases me. I feel like I have definitely found myself over the last 4 years and always try to stay true to what I think my style is. If I'm not feeling it, I don't go with it. :)

Thank you for stopping by, friends. Have a fantastic Saturday, whatever you get up to. xo

Wednesday 22 January 2014

Compost Happens

Hey up!! Wednesday again. 

This week over at My Mum's Craft Shop we've got ourselves a free week, which means the DT girls can whip up whatever they fancy!! I decided to play with yet another Paper Smooches stamp set.

The set I used for this card is "Green Thumb"  - I knew as soon as I seen it I had to have it!! Look at that sentiment - compost happens - perfect for so many cards!! 


There are pieces of veg in the set including this cute carrot and pea pod.

I knew when I sat down to make this card I didn't want it to include any colouring, so I decided to paper piece instead. I used papers from Carta Bella Wildflower pack and really loved how the little seed packets turned out!

I tore some Core'dinations cardstock to create my 'compost' and added a few sprouting leaves above and a tiny snail - so cute!

This card would be perfect to send to a gardening friend or to anyone who is in need of a little pick me up!!

Voila - a card without a ProMarker in sight! I even resisted the urge to colour the little snails shell! ;)

Thank you for stopping by today. Be sure to stop by the MMCS Blog for the rest of the week to see what the DT girls have been up to!! xo

Monday 20 January 2014

A Jar of Eyeballs

I thought I'd start the week off with something a little different from me.

A notebook.

This was commissioned by a lovely lady from America. She wanted a notebook for her daughter. Something including eyeballs, the colour purple and her initials ND. I love being pushed outside of my 'comfort zone' so grabbed this challenge with both hands!


I started with an image from Meljen's Designs, and built the design up around that.

I chose some dark purple textured cardstock from American Crafts and added a doily design using my Indigo Blu Flitter in the colour.. Gin and Tonic. I layered some teal scallops with some checkerboard paper and finally a bow made with ribbon from The Ribbon Girl. 

I didn't want to go too overboard with the embellishments, so added a button to the knot in the now, and a few liquid pearls here and there.

Easy peasy, and I loved it!!

Happy Monday. xo

Sunday 19 January 2014

Happy, Happy, Happy Birthday

It has been quite an afternoon I've had, although.. to be honest it started at about 11 o'clock this morning when my internet went down.


I was feeling ruthless, so decided to have a massive clear out in my room. Two and a bit bin bags later I'm done. I've scrubbed the place from top to bottom, all that is left is fresh bedsheets for tonight and I'm done.

For those of you who don't know, my craftroom is actually my bedroom. I have a big corner desk, a bunch of plastic drawer stacks, some shelves, a mirror and a bed. I seem to get by.. somehow.

I threw away a bunch of everyday crap that I've been holding onto for absolutely no reason what so ever, loads of jewelery that I've either never worn or has tarnished over time, loads of scrap bits paper that are no good to anyone and a heap of other junk. I mean really, I wouldn't class myself as a hoarder, but when I have days like this I really begin to question myself! Hah!

I should have really taken before and after pictures to show you all. I honestly don't know where I keep all the stuff!! 

So, as this is a crafting blog after all, I thought I'd share a card with you that I made earlier in the week for my boyfriend to give to someone. 

It was their birthday, as is obvious from the card and they were male, also obvious.


I used a bunch of mishmash products on this creation:
Embossing folder from SU!
Cardstock from Papercuts and Papermania
Stamps from Clearly Besotted and Hero Arts
Inks from Memento
Brads from Doodlebug
Button from My Mums Craft Shop

 I wanted to keep the card pretty CAS.. this isn't many peoples idea of CAS, but hell.. it's a lot less layered that I usually go for, so I'll stick with that excuse.

I used a new product I bought last year and only just got around to using now, it's Metallic Gilding Wax from Creative Expressions. I added just a tiny bit around the main focus on the card, you can just pick up a little hint of it here and there on the hexagons. I love it!

So, that's all from me tonight. I'm off to put away the cleaning products, bin the bags and get my chair back in from the landing! :) Thanks for stopping by today. Enjoy the rest of your Sunday! :)

Friday 17 January 2014

Happy Cupcake Day

Happy Friday!! Who has that Friday feeling?

I dooo! A whole weekend with the boyfriend and a trip to Ikea is on the cards, and that's just for starters! :) I hope you have exciting things planned!!

Today I thought I'd stop by to share a recent commission with you guys. This was for a lovely lady who I keep in touch with via my FB page. Not only is she a lovely customer, I can also say she is a lovely online friend, too! :)

Her request included cupcakes, purple, turquoise and pink.. and mummy.

Off to work I went.


I already knew I wanted to use Some Odd Girl products, it was just picking out which that was the hardest. In the end I went with:
- Gingerbread Kaylee (for the character)
- Baker Mae and Sweet Thinkin' Mae (for the sentiment)
- Cupcake Mae (for the giant cupcake)
- Kaylee's Closet Wardrobe (for the tiny bow in her hair)

I coloured up Kaylee and the giant cupcake with ProMarkers and FlexMarkers, but you already knew that, to match papers from an Echo Park collection called Here and Now. I LOVE those papers - so bold and bright. I matted my patterned paper onto some deep purple cardstock, I then went around the very edge with some Purple Stickles and added little dots at even intervals (gutted it hasn't showed up very well in the photos, but it's definitely something I'll be trying again!)


Here is a close up of Kaylee and her miniature bow!! This time round I tried to add a little definition to her legs in the form of.. calf lines? Goodness knows what you'd call them, but it breaks up her leg a little and I kinda like it! :) 

Enough waffle, I'd like to enter this card into these challenges:
- Some Odd Girl - Tag You're It!
- Fan-Tastic Tuesday - Pink and Patterned
- Inky Chicks - Anything Goes

That's all from me for today! Thank you so much for stopping by, and take it easy.
Have a lovely weekend, whatever you're up to. xo

Wednesday 15 January 2014

Red, Pink and White at MMCS

Morning guys! :)

I'm back. Looks like my posts are a lot like buses, huh?


I promise now I'm back on track with my shifts at work my posts will be a little more frequent! :) You all know how it is when you get home from work.. the last thing you wanna be doing is sitting in front of a screen!

So this morning I'm here to share some inspiration for My Mum's Craft Shop!!

This week we're all following a theme - the theme is

RED, PINK AND WHITE.

I decided to break out a new stamp set. This is Sugar Rush by Paper Smooches.

I used the stamp set, some Memento ink, a bunch of ProMarkers and some Kraft cardstock.


DONE!

How tasty does that pink icing look?! VERY!! ..and that, to me, looks like a super fruity strawberry shake!! Mmm, mmm!!

I'd like to enter this card into these challenges: 
- Creative Craft Challenges 2 - New
- Papertake Weekly - New Year, New Stash

Thank you for stopping by today. Be sure to head over to the MMCS Blog to check out the girls inspiration for the theme this week! xo

Tuesday 14 January 2014

Just a Fairytale at PFP

Evening guys. I'm here with a later than planned post for Passion for ProMarkers.

The day job has been pretty hectic this past week, and I haven't really had much time for crafting and blogging. I was covering for a lady at work who got whisked away on holiday for her birthday, but now she's back to reality with a bang and I'm back to my normal-ish hours. More time for crafting.

Yippeee!!

So last night was an incredibly late one for me. After a 13-14 hours shift with stock take included, I managed to make it home (I think I drove on auto-pilot) and piled into bed in a heap. I was good for nothing, and luckily boss lady Denise said she'd let me off with a late post - isn't she the best?! BUT I'M BACK!! Better late than never.

This week over at Passion for ProMarkers it's my turn to set the theme - and I wanted you all to have some fun, and practice your colouring. Which is what our challenges are always about!!

Go crazy with big hair and even bigger dresses, fantasy characters and dreamy backgrounds!!

JUST A FAIRYTALE

Here's something I come up with using a bunch of Some Odd Girl delights!!


This scene is quite a whopper - I wasn't really thinking about a particular project when I started stamping the scene, I just kinda.. went with it. No holds barred. I wanted it as a piece I could practice on.

I ended up using a bunch of older Some Odd Girl CLEAR STAMPS and incorporated a load of masking to make sure I created some depth. 

Nouveau Girls - Renew (for the girl, the flowers and the sentiment)
Nouveau Girls - Grow (for the clouds)
Fairies - Pixie Dust (for the toadstools)
Nouveau - Believe (for the leaves)

I just used the edges of some post-it's I always have on hand to create my masks. The easiest and the cheapest and they're thin enough as not to leave a border when you stamp over top.

As always I coloured my piece up using my ProMarkers and FlexMarkers.

I went a little crazy over the new year and ordered a couple of Tria markers in the Cowling and Wilcox sale!! I think I'm in love! LOL!! I won't be buying any more for a while yet though, as they are quite pricey!! It just means I'll have to make a new colour chart to incorporate them! Hehee.

Here is a close up of the focal point of the piece. She's so dreamy! :) 


Now, just out of curiosity.. what colour would you have made her dress? I had already coloured it blue when I asked the lovely ladies on the DT for some suggestions - lilac, purples, yellows, oranges (dang it, why hadn't I thought of those?).. but my boyfriend was arguing that I should have gone red. What are your thoughts? 

I'd love to enter this card into these challenges:
- Lexi's Creations - Anything Goes
- Crafty Boots - Anything Goes
- Crafting When We Can - Outside

I thought I'd throw a random one into the mix and see what you guys come up with. There really is some AH-mazing stuff over at the PFP blog - the DT girls have taken this one by the horns and whipped up some real beauties. So if you need something to get those juices flowing be sure to head over there!!

Thank you so much for stopping by. Peace. xo

Sunday 5 January 2014

Show us the LOVE at MMCS

Good evening guys and girls. I'm only 5 days late with this post *blush* my apologies. 

I'm sitting here typing this up after a very stressful (if you could go that far) and unsuccessful day with my Silhouette Cameo *insert incredibly upset face, with pet lip and teary eyes here* - I think I may have pushed my little machine too far. About 10 sheets of cardstock, uncountable pieces of patterned paper and a heap of copier paper later.. I STILL haven't managed to cut the design I was after.

You know when you have that vision of a card in your head and you just NEED it to happen? Well.. it still hasn't happened!! Not one to give up too easily I spent the best part of 5 hours trying to get my blade to play nice.. to no avail. I'll try again another day, but for now I will attempt to get my blog updated and type up a few posts as I listen to the raindrops crash onto the roof and try and get my head around all of the projects I need to get caught up with in the next week or two.

It hasn't been a very jolly blog post so far tonight.. has it?! Let's change things up a bit!!

Have you guys seen the new JANUARY CHALLENGE over at My Mum's Craft shop?! 

NO?! Head over to the BLOG now and check out the DT's amazing work to get your creative juices flowing.

Here's my take on our LOVE challenge this month.


I printed out Heartsy Mae from Some Odd Girl with a super big head - I LOVE colouring these images up, all of that hair is such fun and you can really go to town with your shading and what not. That's what's so great about digital images, you can print them out to be any size you wish. No barriers!

So with the length of time it took me to colour Mae, I wanted her to stand out on the front of the card, so I kept the design pretty simple. Here's a breakdown of supplies used, all of which can be found at My Mum's Craft Shop!! 

I started out with a new paper pack from My Minds Eye - Cupids Arrow. I took a sheet of the grey patterned paper and die cut one side with the Fluttering Hearts Die from MFT

I wanted to add a back drop to Mae's head, so I broke out a new stamp set I bought recently from Paper Smooches - Metropolis and stamped a row of the skyline outline onto another sheet of patterned paper. I filled in the stamp with my black PM.

As for the sentiment, I don't have many.. if any.. Valentine's specific sentiments on hand, so I had a look through my stash and come across Paper Smooches - Sugar Rush and thought the Hey Sugar sentiment would be perfect and would match just right with Mae's expression! :)

For a little bit of embellishment I die cut another sheet of patterned paper from Cupids Arrow using the Dainty Bows die from MFT, added a little paper bow and a Rhinestone Heart to the know. Voila. 

Now, before I do off and attempt to take the Christmas tree down (don't ask why it's still up.. because I'm not quite sure myself!!) - I'll try and find a couple challenges I'd like to enter this card into:

- A Gem of a Challenge - Something New
New craft stash - paper and stamps
- Crafty Hands - Anything Goes
- Crafting by Designs - Anything Goes
- Inky Impressions - Anything Goes

Thanks for stopping by tonight. Wish me luck and better success with my Cameo next time round please, else I think my head might explode! 

Enjoy the rest of your Sunday and be sure to join in with our LOVE challenge. xo

Search My Blog

My Fellow Craft-o-Holic Followers

Total Pageviews